Gophish documentation
Navigation
Campaigns
Gophish allows you to launch and monitor multiple campaigns at once in its dashboard.

Launch a campaign
To create your campaign, go to the navigation bar and click on “Campaigns.”

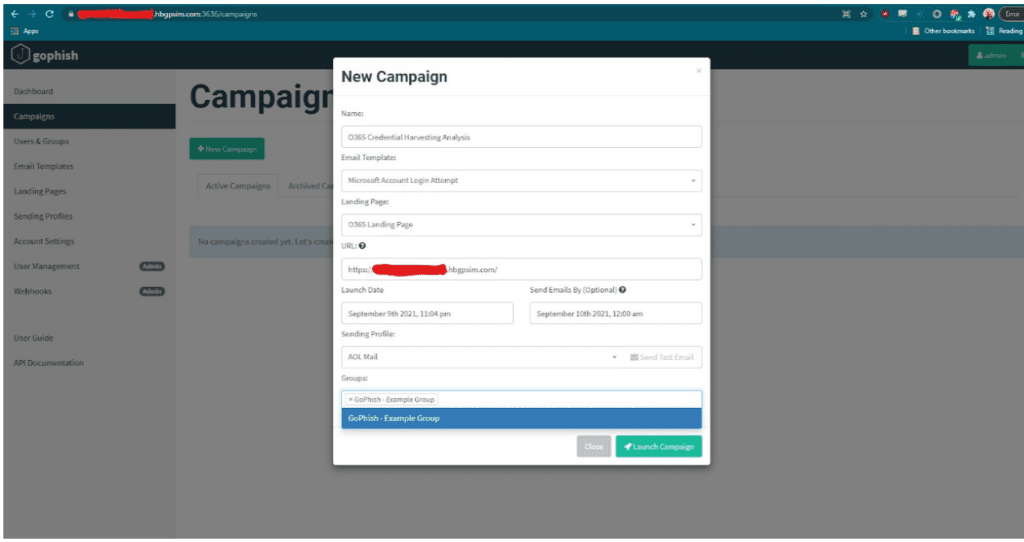
Here is a list of required fields in the Campaign section:
Name – Create a name for your campaign.
Email Template – The email that is sent to the recipient group.
Landing Page – The HTML page that recipients are forwarded to when they click the URL in the email template.
URL – The URL that is contained in the {{.URL}} value in the email templates.
Launch Date – The date that the campaign will begin.
Send Emails By – The last date that campaign emails are sent.
Sending Profile – The SMTP configuration used to send emails.
Groups – The recipients of the campaign.
Scheduling Campaigns
You can use Gophish to plan campaigns ahead of time.
You can schedule campaigns in advance by editing the “Launch Date” and “Send Emails By” sections.
The “Launch Date” is the beginning of the campaign and the “Send Emails By” date is the last day that campaign emails will be sent.
Gophish will send emails evenly distributed between the “Launch Date” and the “Send Emails By” date.
For example:
If you are sending emails to a group of 100 recipients and there are 5 days between the launch date and send by date, then 20 emails will be sent per day.
Launching the campaign
Once the campaign is configured, click the “Launch Campaign” button. After passing the confirmation message, your campaign has officially commenced.
Depending on how you set up your campaign, Gophish will either immediately launch your campaign or wait until the date that you specified.
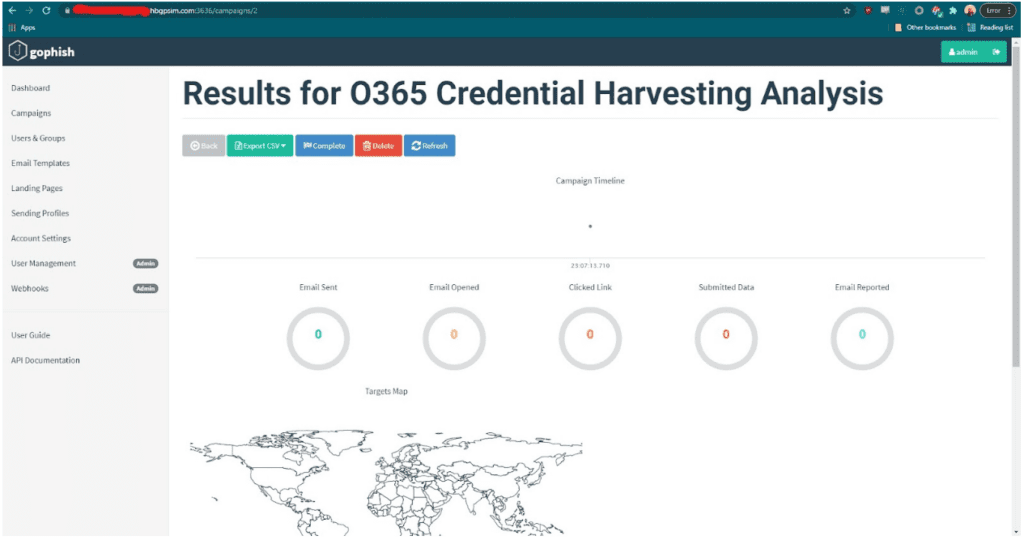
View campaign results
You are automatically redirected to the campaign results page once you’ve launched a campaign.
You can see a campaign overview as well as detailed info for every recipient in your campaign.
Export campaign results
If you want to export the results of your campaign, then you can click “Export CSV” and then select the results that you want to export.
Here are the results that you can choose to export:
id, email, first_name, last_name, position, status, ip, latitude, longitude
You can also export events as they occurred during the campaign (raw event reporting).
Complete a campaign
Hit the “Complete” button to confirm that you would like to mark your campaign as complete.
Delete a campaign
Click the “Delete” button to delete a campaign permanently. Campaigns cannot be restored.
View detailed results
You can see campaign results detailed in an easy-to-view timeline. View the timeline by expanding the row with the recipient’s name. The results page shows whether the recipient opened an email, clicked a link, or submitted data on a landing page. If you selected “Capture Credentials” while building the landing page, you will be able to see that data in the detailed results.
Are You Ready To gophish?
Gophish documentation
Navigation
Campaigns
Gophish allows you to launch and monitor multiple campaigns at once in its dashboard.
Launch a Campaign
To create your campaign, go to the navigation bar and click on “Campaigns.”
Here is a list of required fields in the Campaign section:
Name – Create a name for your campaign.
Email Template – The email that is sent to the recipient group.
Landing Page – The HTML page that recipients are forwarded to when they click the URL in the email template.
URL – The URL that is contained in the {{.URL}} value in the email templates.
Launch Date – The date that the campaign will begin.
Send Emails By – The last date that campaign emails are sent.
Sending Profile – The SMTP configuration used to send emails.
Groups – The recipients of the campaign.
Scheduling Campaigns
You can use Gophish to plan campaigns ahead of time.
You can schedule campaigns in advance by editing the “Launch Date” and “Send Emails By” sections.
The “Launch Date” is the beginning of the campaign and the “Send Emails By” date is the last day that campaign emails will be sent.
Gophish will send emails evenly distributed between the “Launch Date” and the “Send Emails By” date.
For example:
If you are sending emails to a group of 100 recipients and there are 5 days between the launch date and send by date, then 20 emails will be sent per day.
Launching the Campaign
Once the campaign is configured, click the “Launch Campaign” button. After passing the confirmation message, your campaign has officially commenced.
Depending on how you set up your campaign, Gophish will either immediately launch your campaign or wait until the date that you specified.
View Campaign Results
You are automatically redirected to the campaign results page once you’ve launched a campaign.
You can see a campaign overview as well as detailed info for every recipient in your campaign.
Export Campaign Results
If you want to export the results of your campaign, then you can click “Export CSV” and then select the results that you want to export.
Here are the results that you can choose to export:
id, email, first_name, last_name, position, status, ip, latitude, longitude
You can also export events as they occurred during the campaign (raw event reporting).
Complete a Campaign
Hit the “Complete” button to confirm that you would like to mark your campaign as complete.
Delete a Campaign
Click the “Delete” button to delete a campaign permanently. Campaigns cannot be restored.
View Detailed Results
You can see campaign results detailed in an easy-to-view timeline. View the timeline by expanding the row with the recipient’s name. The results page shows whether the recipient opened an email, clicked a link, or submitted data on a landing page. If you selected “Capture Credentials” while building the landing page, you will be able to see that data in the detailed results.
Are You Ready To gophish?
Gophish documentation
Navigation
Campaigns
Gophish allows you to launch and monitor multiple campaigns at once in its dashboard.
Launch a Campaign
To create your campaign, go to the navigation bar and click on “Campaigns.”
Here is a list of required fields in the Campaign section:
Name – Create a name for your campaign.
Email Template – The email that is sent to the recipient group.
Landing Page – The HTML page that recipients are forwarded to when they click the URL in the email template.
URL – The URL that is contained in the {{.URL}} value in the email templates.
Launch Date – The date that the campaign will begin.
Send Emails By – The last date that campaign emails are sent.
Sending Profile – The SMTP configuration used to send emails.
Groups – The recipients of the campaign.
Scheduling Campaigns
You can use Gophish to plan campaigns ahead of time.
You can schedule campaigns in advance by editing the “Launch Date” and “Send Emails By” sections.
The “Launch Date” is the beginning of the campaign and the “Send Emails By” date is the last day that campaign emails will be sent.
Gophish will send emails evenly distributed between the “Launch Date” and the “Send Emails By” date.
For example:
If you are sending emails to a group of 100 recipients and there are 5 days between the launch date and send by date, then 20 emails will be sent per day.
Launching the campaign
Once the campaign is configured, click the “Launch Campaign” button. After passing the confirmation message, your campaign has officially commenced.
Depending on how you set up your campaign, Gophish will either immediately launch your campaign or wait until the date that you specified.
View Campaign Results
You are automatically redirected to the campaign results page once you’ve launched a campaign.
You can see a campaign overview as well as detailed info for every recipient in your campaign.
Export Campaign Results
If you want to export the results of your campaign, then you can click “Export CSV” and then select the results that you want to export.
Here are the results that you can choose to export:
id, email, first_name, last_name, position, status, ip, latitude, longitude
You can also export events as they occurred during the campaign (raw event reporting).
Complete a Campaign
Hit the “Complete” button to confirm that you would like to mark your campaign as complete.
Delete a Campaign
Click the “Delete” button to delete a campaign permanently. Campaigns cannot be restored.
View Detailed Results
You can see campaign results detailed in an easy-to-view timeline. View the timeline by expanding the row with the recipient’s name. The results page shows whether the recipient opened an email, clicked a link, or submitted data on a landing page. If you selected “Capture Credentials” while building the landing page, you will be able to see that data in the detailed results.