API Load Testing With Locust

API Load Testing With Locust: Intro
You’ve probably been in this situation before: you write code that does something, an endpoint for example. You test your endpoint using Postman or Insomnia, and everything works fine. You pass on the endpoint to the client-side developer, who then consumes the API and deploys the application. But then, the API fails when the users use the app.
This can be a super annoying situation to be in, not to mention costly for a business. It is why software developers carry out a variety of tests on software systems to ensure they perform as expected. APIs are no different. Before deployment, you should do at least performance tests and security tests.
Performance tests can be grouped into functionality tests and load tests. Functionality tests are what you usually use Postman or Insomnia for. They ensure that your API functions as you expect. Load tests, on the other hand, are more concerned with how your API performs with real-world usage and peak load, and that is what this article is about. Let’s look at load tests in more detail.
What Is API Load Testing?
API load testing is a type of testing developers use to simulate normal and peak load on endpoints. This kind of testing lets developers evaluate the real-world performance of an API before it is deployed. It helps them identify the maximum operating capacity of a system, bottlenecks if any, and performance degradation. API load tests are usually done by creating virtual users and then using them to test out the API’s functionality concurrently.
API load tests measure metrics like response time, concurrent users, throughput rates, resource utilisation levels, Mean Time Between Failure(MTBF), Mean Time To Failure(MTTF), and so on. All of these metrics can be used to determine how well the API is doing.
Types Of Load Testing
There are several types of load testing, each with its use cases. Let’s take a look at some of them.
Load Testing: This is the basic form of a load test. It’s used to evaluate the performance of a system(in this case, an API) under normal load and expected peak load.
Stress Testing: This is used to evaluate the performance of a system under a very heavy load. The goal of this test is to see if a system recovers after failure, and how long it takes to do so. The load is usually ramped up slowly till it exceeds the capabilities of the system.
Spike Testing: This is a little similar to stress testing, except heavy load is applied suddenly, as opposed to slowly ramping it up. This kind of test represents what happens when there is a sudden spike in your average number of users or visitors, or when there is a DDOS attack on your system.
Soak Testing: This test is unlike the others above. It puts your system under 80%(or thereabout) of normal load and leaves it running for a lengthy period, say 12 to 14 hours. This kind of test determines how reliable a system is over time.
Load Testing Your APIs With Locust
Developers have access to a variety of options for load testing their APIs. Some common load testing tools are Gatling, JMeter, and Locust. We will be focusing on Locust in this article.
Locust is a python-based open-source load testing tool used by top companies such as Google, Microsoft, and Riot Games to test their APIs. In this article, we will demonstrate how to load test an API.
For this tutorial, I’ll be creating a simple API with Flask. You can follow along with me or just create your API with Node, or whatever framework you are comfortable with.
Requirements
Python 3
Setup & Installation
First, you need to set up a virtual environment on your PC so that you don’t mess up your global Python environment. To do that, run the following commands. Note that these commands apply to a Windows terminal.
$ mkdir project
$ cd /d path\to\project
$ python -m venv venv
$ venv\Scripts\activate
First, we created a project directory. Then we changed our current directory to project. We then created and activated a virtual environment for Python inside that directory.
Now, we will move on to installing Flask(we will use it to create the endpoints to be load tested) and Locust itself.
To install Flask, run. Make sure you’re in the project where you created a virtual environment.
$ pip install flask
To install Locust, run
$ pip install locust
Once that is done, type out the following commands. Make sure you are in your project directory when you do this.
$ copy nul __init__.py
$ mkdir app
$ copy nul app\app.py
$ copy nul app\__init__.py
This commands creates some files which we’ll use to create our endpoints using Flask. You can also create these files using your file explorer by the way. But what’s the fun in that? Once you’ve done that, copy the below code into app.py
from flask import Flask, jsonify, request
app = Flask(__name__)
car_models = [
{ ‘brand’: ‘Tesla’, ‘model’: ‘Model S’ }
]
plane_models = [
{ ‘brand’: ‘Boeing’, ‘model’: ‘747’ }
]
@app.route(‘/cars’)
def get_cars():
return jsonify(car_models)
@app.route(‘/planes’)
def get_planes():
return jsonify(plane_models)
if __name__ == ‘__main__’:
app.run(debug=True)
The above code contains a method get_cars used to get a list of car brands and their models, and get_planes used to get a list of plane brands and their models. For us to load test this endpoint, we need to run app.py. To do that run the below command.
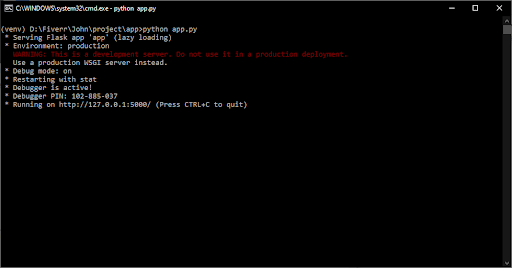
$ python path\to\app.py
Once you run that, you should see something like this:
If you copy the URL from the terminal and type cars or planes after the /, you should be able to see the data there. However, our goal is to test the endpoint with locust, not with the browser. So let’s do that. Run the following command in the root of your project directory.
$ copy nul locust_test.py
This creates a ‘locust_test.py’ file in the root of your project directory. Once you’ve done that, open the file and paste in the below code. We will explain it shortly.
import time
from locust import HttpUser, task, between
class UserBehaviour(HttpUser):
wait_time = between(5, 10)
@task
def get_cars(self):
self.client.get(‘/cars’)
@task
def get_planes(self):
self.client.get(‘/planes’)
This is a basic example of using Locust to load test an API. First, we create a class UserBehaviour, which can be given any appropriate name but must extend HttpUser. HttpUser is the class that takes care of instantiating multiple virtual users to carry out the tasks we specify in the UserBehaviour class.
A task is specified by decorating a method with the @task decorator. We also have a function called between() that allows us to specify a range of seconds to wait for before executing the next task. You can see that we assigned a range of 5 to 10 seconds for that in our code.
To run the code, make sure you are still in your virtual environment. If the one you created is being used by the server serving the API, open a new terminal, change your directory to your project directory, and activate the virtual environment you created. You can find the command for activating a virtual environment above. Now, enter the below command in your terminal.
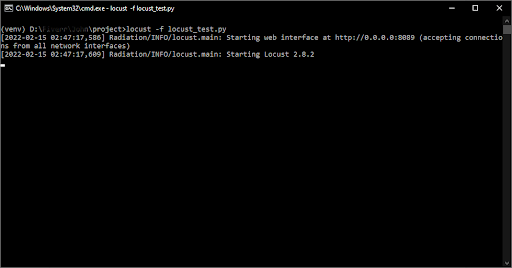
$ locust -f locust_test.py
You should see something like this:
By default, locust’s web interface is located at http://localhost/8089. If you visit the website, you should see an interface like this:
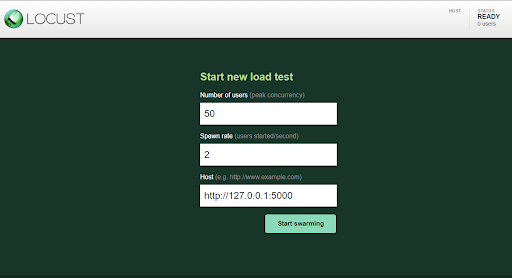
From the interface, we can specify the number of users, spawn rate(users created per second), and Host. You can get the address of your host by checking the terminal where the server is running. In our case, it is at port 5000. When you click on Start swarming, you’ll be presented with the interface below.
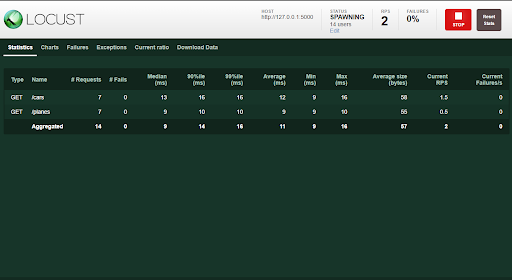
This shows you various useful metrics such as the number of failed requests, average time for a request, the minimum time for a request, requests per second, and so on. Once you’re satisfied with what you see, you can click on the stop button.
Besides the Statistics tab, there is a Charts tab that shows more information in the form of a graph, like the image below.
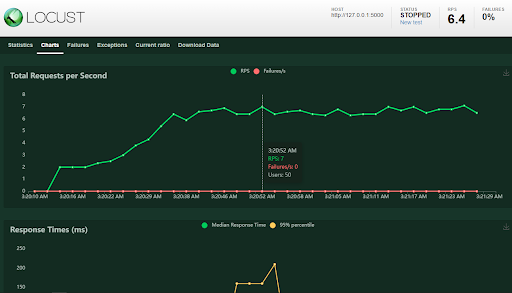
There is a total requests per second graph, response time graph, and number of users graph, all plotted against time. Using the graphs, you can determine how many users are acceptable for a fixed response time, or you can observe your charts for a constant response time despite an increasing number of users, and other insights like that. If you want to share these stats with someone else, you can download a report from the Download Data tab.
To Conclude...
Load testing your API is a crucial activity in your development process, so make sure it’s incorporated in your design cycle. By the way, you can also carry out other load test types by varying the values for the number of users and spawn rate.
If you want to do a spike test, specify a large value( say 2000) for the number of users, and then an equally large value for your spawn rate(500 for example). This means that in 4 seconds, you’d have all 2000 users created and accessing your endpoints. A stress test will be similar, but with a much lower value for spawn rate. To find out all you can do, check out the Locust documentation.